Van Life Maintenance 101: Stop Your RV Toilet Valve Leaking
Spotting Trouble: Recognizing a Leaking RV Toilet Valve
Ever been on the road, fully immersed in the freedom of life on the road, only to hear your water pump kick on when no one is using water? That was me, not too long ago, during a trip in the beautiful beaches of Mexico. This unexpected sound is a telltale sign: somewhere, something is leaking. And in my case, it was the RV toilet valve. It is a more common issue than you might think, and it can throw a real wrench into your travel plans.
Keeping up with regular maintenance on your rig is crucial. It is not just about the big things, like engine checks and tire rotations; it’s also about those small components that can lead to big headaches if ignored—like a leaking toilet valve. These issues might sneak up on you, but they’re far from insurmountable.
In this post, we’ll dive into how to spot, diagnose, and fix a leaking RV toilet valve. Drawing from my own experience, where getting parts was a challenge but not impossible, and doing the repair was daunting but definitely doable, I’ll show you that if I can do it, anyone can. Let’s get started on ensuring your home away from home stays dry and comfortable, no matter where you’re parked.
RV Plumbing Essentials: A Deep Dive into Toilet Valves
When you think about the components that make your RV feel like a home on wheels, your toilet might not be the first thing that comes to mind. Yet, it plays a pivotal role in making your travels comfortable and hassle-free. At the heart of your RV’s toilet system lies the toilet valve, a critical piece that controls the flow of water into the toilet bowl.
So, what exactly is an RV toilet valve? It is a device designed to let water into your toilet when you flush it, ensuring a clean sweep of the bowl. But its job does not end there; it also seals off the water flow once the toilet is flushed, maintaining the integrity of your RV’s water system and preventing unnecessary water waste.
There are several types of toilet valves used in RVs, each with its own set of features and mechanisms. The most common ones include gravity flush valves, which rely on water’s natural pull to flush the waste, and pedal flush valves, which use a foot pedal to open the valve for flushing. Some newer models come equipped with electric flush valves, offering a touch of modern convenience to the RV bathroom experience.
However, when a toilet valve starts leaking, it can significantly impact your RV lifestyle. A leaking valve not only leads to water waste but can also cause the water pump to run unexpectedly, signaling a loss of water that could have been used for showers, cooking, or cleaning. Over time, this can lead to unwelcome surprises, such as discovering your fresh water supply has diminished far quicker than anticipated, or worse, finding water damage in your RV.
Understanding the role and types of RV toilet valves is the first step in maintaining this essential component. Recognizing the early signs of a leak and knowing how it can affect your RV experience will prepare you to act swiftly, ensuring your adventures remain as carefree as intended.
From Puddles to Problems: Spot an RV Toilet Valve Leaking
Discovering a leak in your RV can be a subtle affair until it is not. One day, I noticed a small puddle of water near the toilet—a minor inconvenience, I thought. However, this puddle gradually expanded into a more significant, more alarming water presence, signaling a problem that could no longer be ignored. Alongside this growing water issue, the sound of my water pump running without a clear reason added to the mystery and urgency of the situation. These were clear signs that my RV toilet valve was leaking, a realization that set me on a path of prompt action and repair.
The first, and perhaps the most obvious sign of an RV toilet valve leaking, is water on the floor around your toilet. A small puddle can quickly escalate into a larger problem if not addressed. Water should never be present outside of normal flushing operations, so any unexplained moisture is a red flag.
Another indicator is unusual noises coming from your plumbing, particularly the sound of your water pump activating when no water is being used. This was a key clue for me. The pump’s unexpected operation is often your RV trying to maintain water pressure in the face of a leak, an effort that not only wastes your water supply but can also wear out your pump prematurely.
A constantly running toilet can also signal a problem. If you notice that the toilet seems to engage in a perpetual flush or refill cycle, it is likely due to water continuously leaking from the valve, failing to reach the fill line, and thus never fully shutting off.
Early detection of these signs is crucial. Catching a leak in its infancy can prevent not only the inconvenience of an unexpected repair but also more severe damage to your RV’s flooring, subflooring, and potentially its electrical and structural components. Regular checks and an ear tuned to the sounds of your RV can save you from costly repairs and preserve the sanctity of your home on wheels.
Being aware of these indicators and responding swiftly can make all the difference. As I learned, what starts as a small puddle can quickly become a larger issue, but with prompt action, disaster can be averted, ensuring your adventures continue smoothly and your RV remains a safe, dry haven.
Preventing the Drip: Causes and Solutions for RV Toilet Valve Leaks
When it comes to RV maintenance, being prepared is half the battle. Through my own experiences and the shared wisdom of the RV community, it’s become clear that a leaking toilet valve is not just a common annoyance; it’s almost a rite of passage for RV owners. This issue often stems from a few usual suspects: wear and tear, faulty installation, winter damage, or debris build-up. Given the frequency of this problem, carrying a spare toilet valve and water pump can be a lifesaver on long road trips. It’s a good idea to create a checklist to keep handy for every road trip like this one. Let’s delve into these causes and explore how regular maintenance can mitigate them.
Wear and Tear
The most straightforward cause of a leaking toilet valve is simple wear and tear. Over time, the constant flow of water and the repetitive motion of opening and closing can degrade the valve’s components. This is especially true for RVs, where road vibrations and the occasional jostle from uneven terrain can accelerate wear. Regular inspection and replacement of worn parts can prevent leaks from developing.
Faulty Installation
Sometimes, the issue begins not with the passage of time but with the valve’s installation. A valve that hasn’t been installed correctly can misalign, leading to poor sealing and eventual leaks. Ensuring that installation is done right, either by double-checking the work yourself or seeking professional assistance, can save you from future headaches.
Winter Damage
For many RVers the cause of their RV toilet valve leaking is improper winterization (check out this blog post about living off-grid in the winter). Any RVer knows that winter brings a slew of maintenance challenges, and the toilet valve is no exception. If the RV isn’t properly winterized, water remaining in the valve can freeze, causing cracks and leaks when it thaws. The key to avoiding this is thorough winterization, ensuring all water is evacuated from the plumbing system before the first freeze.
Debris Build-up
Lastly, debris build-up is a common culprit behind leaking valves. Water quality can vary significantly from one location to another, and sediment or other particles can accumulate in the valve, preventing it from closing properly. A regular cleaning schedule can help keep the valve free from debris and functioning correctly.
The reality that these components are not always built to withstand the rigors of full-time RV life underscores the importance of being proactive. Regular maintenance isn’t just about fixing problems as they arise; it’s about preventing them in the first place. By understanding these common causes of leaks and taking steps to address them, you can keep your RV’s plumbing in top shape and ensure that your adventures remain uninterrupted by unexpected repairs.
Leak Detective: Pinpointing the Source Behind Your RV Toilet Leak
Discovering a leak in your RV toilet can initially seem like finding a needle in a haystack, especially when the leak is slow and the source is hidden behind the tight confines of your RV’s bathroom. In my own van, getting behind the toilet to see where the water was coming from proved to be a real challenge. As the leak worsened, however, the source of the problem became more apparent, prompting a more in-depth investigation. Here’s a step-by-step guide to diagnosing the leak, including a handy tip that helped me pinpoint the issue without having to become a contortionist.
Step 1: Initial Observation
Start by visually inspecting the area around your toilet for any signs of moisture or leaks. If the leak is small, it might not be immediately obvious, but any water on the floor or dampness around the toilet base is a clue worth noting.
Step 2: Narrowing Down the Source
As the leak becomes more pronounced, identifying the source becomes easier, but initially, it can be quite tricky. In my case, the cramped space behind my toilet made it difficult to see directly where the water was coming from.
Step 3: The Smartphone Trick
To overcome this challenge, I turned the camera on my phone to front-facing mode and recorded a video while maneuvering the phone behind the toilet. This improvised inspection tool allowed me to see behind the toilet without having to physically squeeze into the small space. Watching the video, I could observe where the water was leaking from, making it easier to identify the valve as the culprit.
Step 4: Confirming the Valve Issue
Once you have a visual on where the leak appears to be coming from, the next step is to confirm that the valve is indeed the issue. Check for cracks, loose connections, or wear on the valve itself. If the valve appears damaged or excessively worn, it’s likely the source of your leak.
Step 5: Testing
If the valve’s integrity seems intact, conduct a test by flushing the toilet and observing the area you suspect is leaking. Make sure to dry the area first, so any new moisture is easier to spot. This can help confirm if the valve or another component is leaking.
Step 6: Decision Time
Based on your findings, decide whether the valve needs replacing or if another repair might be in order. Remember, if the valve is the issue, prompt replacement is crucial to prevent further damage to your RV.
Diagnosing a leak in your RV toilet valve can be a challenging but not insurmountable task. With a bit of ingenuity and patience, you can identify the problem and take steps to fix it, ensuring your RV remains a comfortable and leak-free home on the road.
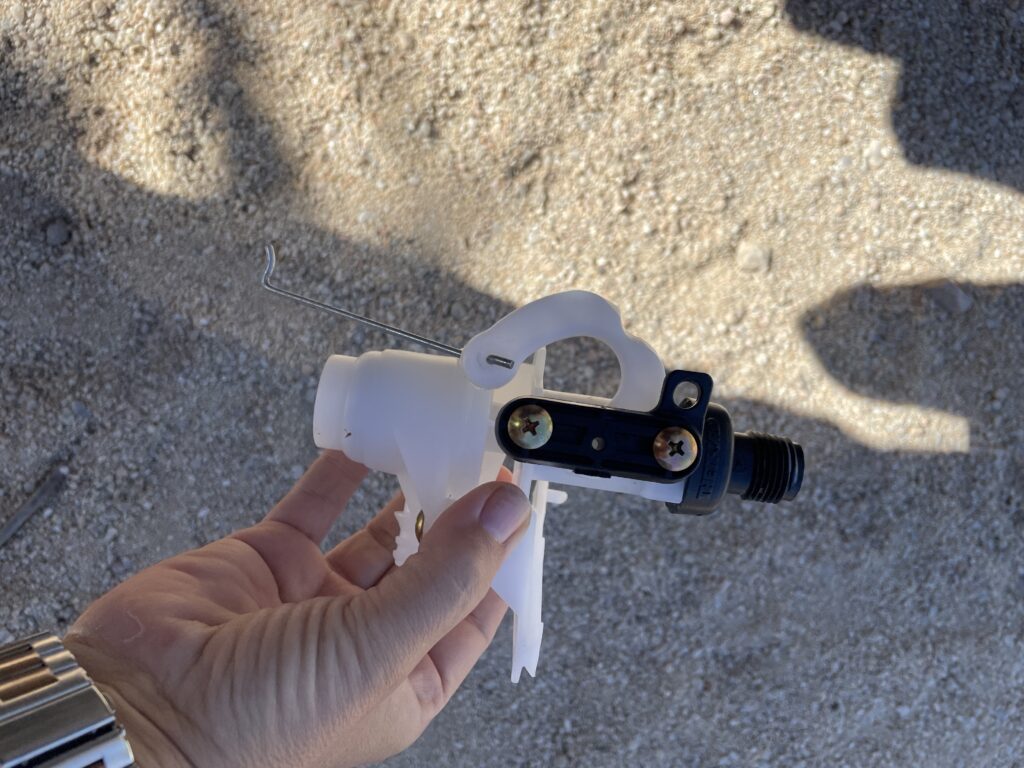
Fixing a Leaking RV Toilet Valve
When faced with an RV toilet valve leaking, the most straightforward and effective approach is to replace the valve entirely. While this task might seem daunting at first, with the right guidance and tools, it’s quite manageable—even for those of us who aren’t seasoned DIYers. Based on my own experience, bolstered by helpful tips from a YouTube tutorial, here’s how you can tackle this repair with confidence, including a smart addition to your plumbing system that could save you headaches down the road.
Tools and Materials Needed
- New toilet valve kit compatible with your RV toilet model
- Adjustable wrench or set of wrenches
- Screwdriver (type depends on your toilet’s screws)
- Teflon tape (for securing connections)
- Optional but recommended: an inline cut-off valve
Safety Precautions
Before starting any repair, ensure that your RV’s water supply is turned off and that the toilet and water lines are drained to prevent any spillage during the repair process. Additionally, it’s wise to wear protective gloves to keep your hands clean and safe from any sharp edges.
Here is the video I watched a couple of times before attempting this project on my own…
Step-by-Step Repair Instructions
- Prepare the Area: With the water supply turned off, flush your toilet to drain any remaining water. Absorb any leftover moisture with a towel.
- Toilet Removal: In many cases, especially in vans or smaller RVs, you’ll need to remove the toilet to access the leaking valve. This usually involves unscrewing the toilet from the floor and disconnecting it from the water supply line. Handle with care to avoid damage.
- Install the Inline Cut-off Valve (Optional): This step is easier with the toilet removed. Installing an inline cut-off valve to your water supply line can be a game-changer for future maintenance, allowing you to isolate the toilet from your RV’s water system without impacting the rest of your rig.
- Valve Replacement: With the toilet removed, replace the old valve with the new one, applying Teflon tape to the threads to ensure a watertight seal. Follow the specific instructions provided with your valve kit to ensure correct installation.
- Reinstall the Toilet: Once the new valve is in place, carefully reinstall the toilet, reconnecting it to the water supply line and ensuring it’s securely fastened to the floor.
- Testing: Turn the water supply back on and conduct several flush tests to ensure there are no leaks and that everything is functioning as it should.
Temporary Fixes vs. Permanent Solutions
While there are temporary fixes, such as using sealant or tape to patch up a leaky valve, these are not recommended as long-term solutions. The reliability of your RV’s plumbing system is too crucial to risk on temporary measures. Replacing the valve entirely is the most effective way to address the issue.
The Importance of Using the Right Replacement Parts
Choosing the correct replacement parts for your specific RV toilet model is critical. Using generic or incorrect parts can lead to further issues or even damage your system. Always opt for compatible parts, ideally from the toilet’s manufacturer, to ensure a seamless fit and optimal functionality.
Replacing a leaking RV toilet valve might seem like a task best left to professionals, but with the right instructions and a bit of confidence, it’s entirely within your reach. This repair not only solves the immediate problem but also upgrades your RV’s plumbing system, making future maintenance simpler and less intrusive on your overall water usage.
No Drips, No Drama: The Ultimate RV Maintenance Schedule for Leak Prevention
Preventing future leaks, especially in the critical area of your RV’s toilet valve, begins with a commitment to regular maintenance and thorough preparation for the colder months. Ensuring your rig remains leak-free not only enhances your travel experience but also protects your investment over the long term. Here is a guide to establishing a maintenance routine that keeps your plumbing system in top condition and highlights the critical importance of fully winterizing your RV.
Establishing a Regular Inspection and Maintenance Schedule
- Monthly Inspections: Make it a habit to inspect your RV’s plumbing system, including the toilet valve, for any signs of wear, leaks, or damage. Look for cracks, loose fittings, or any deterioration that could lead to problems.
- Annual Deep Dive: Once a year, conduct a thorough review of your entire plumbing system. This includes checking all water lines, seals, and valves. Replace any parts that show significant wear to prevent leaks before they start.
Winterizing Your RV: A Critical Step
- The Necessity of Full Winterization: As temperatures drop, the water in your RV’s plumbing system can freeze, expanding and causing pipes, valves, and other components to crack and leak. Full winterization of your rig is essential for any owner planning to store their vehicle in freezing temperatures or use it during the colder months.
- Drain and Antifreeze: Start by draining all tanks and lines of water. Then, use RV-specific antifreeze to protect your system. Pay special attention to the toilet valve, ensuring it is completely free of water and protected.
- Seal and Insulate: Check for any areas where cold air might penetrate and freeze your pipes or valves. Use insulation or heat tape on pipes and valves in vulnerable areas to provide extra protection against freezing.
The Importance of Full Winterization
Fully winterizing your RV is not just about avoiding the inconvenience of frozen pipes; it’s about safeguarding the entire plumbing system against significant damage. Freezing temperatures can be brutal on an RV’s water system, and the cost of repairing or replacing components after a freeze can be substantial. Taking the time to thoroughly winterize your rig can save you from costly repairs and ensure that your RV is ready to go when the warmer weather returns.
An Ounce of Prevention
Regular maintenance and proper winterization are the keys to preventing future leaks and ensuring the longevity of your RV’s plumbing system. By adopting a proactive approach to RV care, you can enjoy seamless travels without the unexpected interruptions caused by plumbing issues. Remember, a little effort in maintenance and preparation can lead to a lot of peace of mind down the road.
Wrapping It Up: The Road to a Leak-Free RV Journey
Addressing a leaking RV toilet valve promptly isn’t just about fixing a current inconvenience; it’s about safeguarding the future of your mobile home and ensuring that your adventures on the road remain as carefree as possible. The journey through diagnosing and repairing a leak, as we’ve explored, underscores the broader theme of proactive RV maintenance. It’s a testament to the idea that a little attention and timely action can prevent the majority of plumbing woes.
I encourage you to integrate the tips and practices we’ve discussed into your regular RV maintenance routine. Regular checks, immediate action on detected leaks, and thorough winterization are not just tasks; they’re investments in the longevity and enjoyment of your RV. They’re your best defense against the disruptions that plumbing issues can cause to your nomadic lifestyle.
I’d also love to hear from you. Your experiences, tips, and stories regarding RV toilet maintenance could be immensely valuable to fellow RVers navigating similar issues. Have you found a particular technique especially effective? Or perhaps you’ve devised a unique solution to a common problem? Sharing these insights can help build a community of informed, resilient RVers, ready to tackle any challenge that the road—or their RV—throws at them.
Together, we can turn the daunting task of RV maintenance into a manageable, even enjoyable, part of our travels. So, let’s keep the conversation going. Share your stories, ask questions, and let’s all contribute to a wealth of knowledge that makes RV living not just a dream, but a dream come true.
Drip Drop Dialogue: We Want to Hear Your Plumbing Tales
Now that we’ve navigated the ins and outs of preventing and fixing a leaking RV toilet valve, I’d love to hear from you! Whether you’re battling a drip, have conquered leaks with unique fixes, or simply have questions about RV toilet maintenance, your insights and inquiries are invaluable. Share your experiences and tips in the comments below—let’s help each other keep our rolling havens leak-free and ready for adventure.
And if you’re thirsting for more tips, tricks, and tales from the road, don’t forget to follow or subscribe. From detailed maintenance guides to spontaneous travel stories, we’ve got the content to fuel your journey and keep your RV in prime condition.
So, grab your wrench or your keyboard, and let’s build a community of well-informed, well-prepared RV enthusiasts. Your next great adventure awaits, and together, we can ensure it’s smooth sailing—or should I say, smooth rolling—all the way.