Everything You Need to Know About RV Toilets

everybody poops. RV Black Tanks aren’t that scary.
Yes, you can do a number 2 in your camper and survive not only the toilet paper but also cleaning out your black tank on a regular basis! I see some folks doing their own van builds and not including bathroom facilities, for me, it’s something I would never be without in any camper I had. One reason why I bought my first Class B – camper van, was because I no longer wanted to leave my tent in the middle of the night to go find a dark smelly outhouse. And as a female this happens A lot, men can wander outside, find a tree on which to pee, no flashlight, and no stench.
Gravity Fed Toilet – Porcelain or Plastic


Gravity-flush toilets: These are the most common types of RV toilets. They use gravity to move waste into a holding tank, which can then be emptied at a dump station. Gravity-flush toilets are affordable, easy to install, and require minimal maintenance. They come in porcelain or plastic and are the closest to the toilet you would see in a sticks and bricks home. Most of these styles of toilets have a pedal flush which is a bit strange at first but very easy to get used to. I find myself trying to use my foot to flush at regular restrooms all the time.
A problem some folks encounter with gravity flush toilets is clogging. I have been full time since 2009 and have been really lucky to have never had a clogged toilet in my RV. I use conventional Kirkland brand toilet paper. The thing you need to remember with these toilets is that they should start with a decent amount of water in the bottom relative to the size of your tank. I know it takes roughly 20 minutes of running the bathroom sink to fill up my black tank, so i run my bathroom sink for 5 minutes. I also use a product called “happy camper”, I have tried other additives and the GEO method, and this product is the one I have had the best results with.
I also tear off TP in groups of 3 so that it is already starting in a broken-down state. It’s ok to use several groups of three squares but tear it off in chunks of three. People don’t realize what bundles of TP does, an RV toilet is not the same as a house toilet, and those big bundles will even clog a house toilet. Also count to three when you are flushing a number 2, makes sure there is enough water in there.
A gravity flush toilet also needs to be vented properly and NEVER run your fantastic fan in the out direction when you flush, that will literally suck the smells from your open tank into your living space. It’s a good idea to rinse your black tank every time you empty it. It’s a really good idea to have a see through attachement so you can tell when the tank is rinsed enough. An even better idea is to have a back flush system on your black tank. My Class A RV has a built in flushing system, but you can pick one of these up from Amazon or Camping World for pretty cheap.
Rinsing the tanks is pretty challenging when you boondock most of the time, simply due to the lack of access to water, in which case you might want to occasionally try and go for a drive after you empty the tank. I like to rinse it at least once at the dump station, fill the tank about half full of water and a generous dose of “Happy Camper” then go for a drive, I’ve also used hot water and oxy clean, soda water is another thing I’ve tried. A clean tank is a Happy Camper hahahaha, pun intended.
I had the toilet in my Class A replaced about 3 years ago, there have been a few occasions over these past years that I have wished I went with one of these other styles instead. As it’s currently parked at my parent’s house with no access to a dump station and no insurance and the cost to get it pumped out was no less than $150CDN, I’m really wishing I had gone with a different style. After doing my reasearch into everything I needed to know about Rv toilets, I had looked into all of the types except for the dry flush system and to be honest I’m leaning heavily toward it being a super convenient system.
Casette Toilet


If you are building a van conversion you probably started by researching everything you need to know about RV toilets, one of the most common style in many vans is the cassette toilet. They are a type of portable toilet that are often used in RVs, particularly in smaller campervans or trailers. They are compact and lightweight, and can be easily removed from the RV for emptying and cleaning.
Cassette toilets consist of a seat and bowl, along with a removable waste cassette that sits below the bowl. When the toilet is used, waste is deposited into the cassette. The cassette can then be removed from the RV and taken to a dump station for emptying.
One of the advantages of a cassette toilet is that it can be used in areas where dump stations are not available. This makes them ideal for boondocking or dry camping. They are also relatively inexpensive and easy to maintain, as the cassette can be cleaned with a hose or pressure washer.
On the downside, cassette toilets have a smaller holding capacity than other types of RV toilets, which means that they need to be emptied more frequently. Additionally, because the cassette is located inside the RV, it can sometimes be difficult to remove and transport without spilling.
Overall, cassette toilets are a good option for RVers who value portability and convenience over capacity. They are particularly well-suited for smaller RVs or for use in remote locations where dump stations are not available. However, if you have a larger RV or plan to spend extended periods of time on the road, you may want to consider a toilet with a larger holding tank. None of my rigs have had cassette toilets, it seems like a great option though, if I were doing my own build I would definitely be considering this because they are quite compact and fairly easy to deal with.
Composting Toilet


Composting toilets use natural processes to break down waste and create compost. They do not require water or electricity to operate, making them a sustainable and eco-friendly option.
Composting toilets typically consist of a seat and bowl, along with a separate chamber where the waste is composted. When the toilet is used, waste is deposited into the composting chamber, along with a bulking agent such as sawdust or coconut coir. The bulking agent helps to absorb moisture and promote aerobic decomposition of the waste.
Over time, the waste breaks down into compost, which can be removed from the composting chamber and used as fertilizer. Some composting toilets also have a ventilation system to remove odors and promote proper composting.
One of the advantages of a composting toilet is that it is environmentally friendly and can be used in areas where water and electricity are not available. Additionally, because the waste is converted into compost, it does not need to be emptied as frequently as other types of RV toilets. Proper ventilation is important for composting toilets.
On the downside, composting toilets can be expensive to purchase and install, and they require regular maintenance to ensure proper composting. The composting chamber must be periodically emptied and cleaned, and the bulking agent must be replenished. Another downsize is the size, these things are pretty large if you’re doing a small build it might not be a great option, but would work really well for a tiny house.
Overall, composting toilets are a good option for RVers who are looking for a sustainable and eco-friendly toilet that does not require water or electricity. However, they can be more expensive and require more maintenance than other types of RV toilets, and may not be suitable for all RVers. The problem I see with this is the regular emptying of the pee portion and also the suggestion that the compost is to be disposed of in a garbage bag that will end up in the landfill. A garbage bag full of compost really isn’t that environmentally friendly IMO.
If you have read and researched everything you to know about RV toilets you definitely should check out the following video about composting toilets it was the most honest and eye-opening information I had found to date.
Incinerating Toilet

Incinerating toilets use heat to burn waste into ash. They do not require water or plumbing, and can be easily installed in any location.
Incinerating toilets typically consist of a seat and bowl, along with a combustion chamber where the waste is burned. When the toilet is used, waste is deposited into the combustion chamber, where it is exposed to high temperatures and burned into ash. Some models have a ventilation system to remove odors and smoke.
One of the advantages of an incinerating toilet is that it does not require water or plumbing, which makes it ideal for RVs and other off-grid locations, you will never need to learn how to stop your toilet valve from leaking.. Additionally, because the waste is burned into ash, it does not need to be emptied as frequently as other types of RV toilets.
On the downside, incinerating toilets can be VERY expensive to purchase and install, and they require a power source to operate. Additionally, because the waste is burned, there may be odour and smoke emissions during the burning process, which can be unpleasant for some RVers. You will need to vent this properly and like a composting toilet, these are quite large.
Overall, incinerating toilets are a good option for RVers who are looking for a toilet that does not require water or plumbing, and that does not need to be emptied as frequently as other types of RV toilets. However, they can be more expensive and require a power source to operate, and may not be suitable for all RVers but might be a great option for a tiny house!
Dry Flush Toilet – New Type of RV Toilet
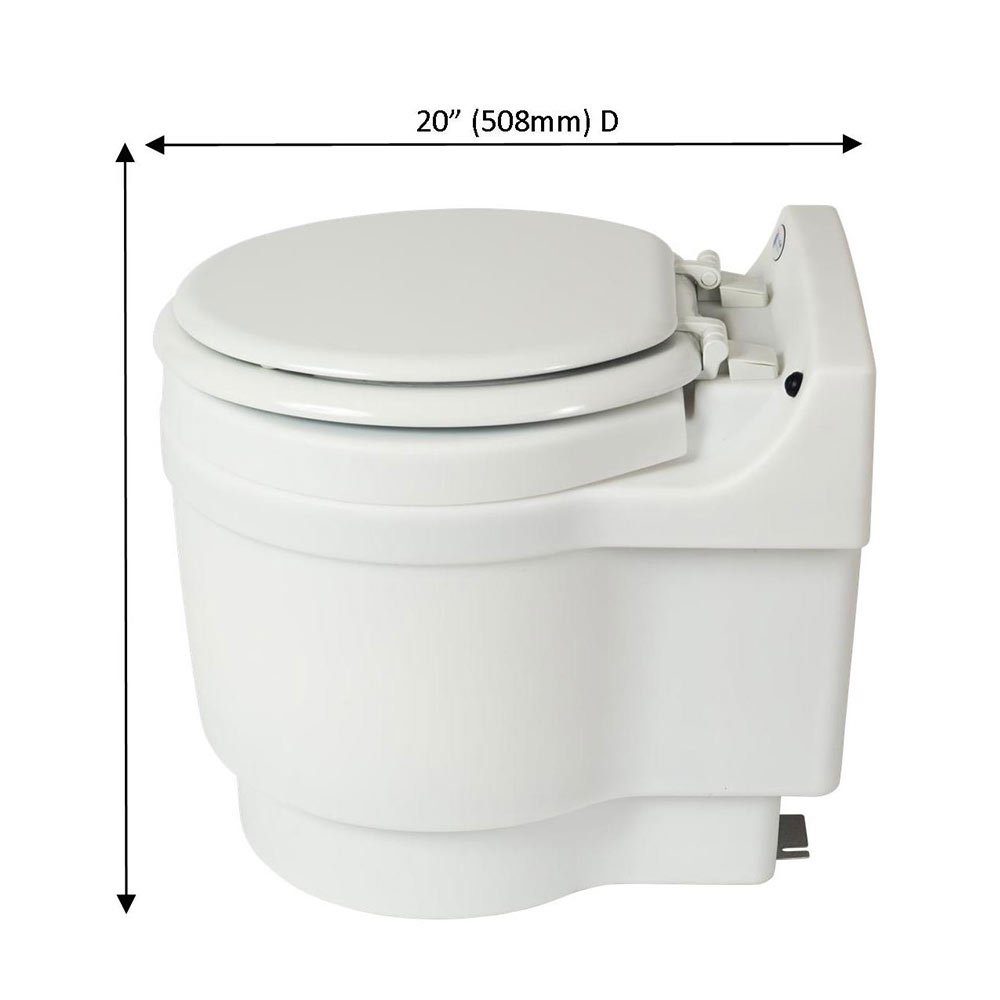
a dry flush toilet is a type of toilet that uses a bagging system to dispose of waste.
Dry flush toilets typically consist of a compact, self-contained unit that is powered by batteries or electricity. The toilet has a seat and a lid, and when the user is finished, they press a button or lever to initiate the flushing process. Instead of using water to flush waste, the toilet uses a liner or bag to contain the waste.
Once the user has finished using the toilet, they press a button or lever to activate the bagging system. The waste is then sealed in an odor-free bag, which can be disposed of in a regular trash can or bin. The bagging system typically uses a combination of sealant and heat to prevent odors and to sanitize the waste.
One of the main advantages of a dry flush toilet is that it is highly portable and does not require any water or plumbing connections. It can be used in a variety of settings, including RVs, boats, and off-grid cabins. Additionally, the bagging system eliminates the need for any type of waste holding tank, making maintenance and cleaning easier.
On the downside, dry flush toilets can be expensive to purchase and may require replacement bags or liners, which can add to the ongoing costs. Additionally, the bagging system may not be suitable for all users, as some people may find it unpleasant or difficult to use. It’s similar to a diaper genie waste goes in, it self twists and gets disponsed of properly.
Overall, dry flush toilets are a good option for people who need a highly portable, self-contained toilet that does not require water or plumbing connections. However, they may not be suitable for all users and can be more expensive than other types of portable toilets.
Macerating

Macerating toilets are a type of RV toilet that use a macerator to grind up waste before it enters the holding tank. The macerator is a motorized device that breaks down waste into small particles, making it easier to move through the pipes and into the holding tank.
Macerating toilets are a good option for RVs with low ground clearance or where the holding tank is located above the toilet. This is because the macerator can pump waste uphill, which is not possible with a gravity-flush toilet. Additionally, macerating toilets can be installed in locations where traditional plumbing is not possible, such as in a basement or below-grade area.
One of the advantages of a macerating toilet is that it can handle a greater volume of waste than a gravity-flush toilet, which means that it needs to be emptied less frequently. Additionally, because the waste is broken down into smaller particles, it is less likely to cause clogs in the plumbing system.
On the downside, macerating toilets are typically more expensive than gravity-flush toilets, and they require more maintenance. The macerator must be regularly cleaned to prevent buildup of waste and debris, and the motor may need to be replaced periodically.
Overall, macerating toilets are a good option for RVers who need to pump waste uphill or who are looking for a toilet that can handle a higher volume of waste. However, they are more expensive and require more maintenance than other types of RV toilets. There is an external macerating pump you can add to your black tank that I’ll discuss below in the “black tank accessories” section.
Vacuum Flush Toilet
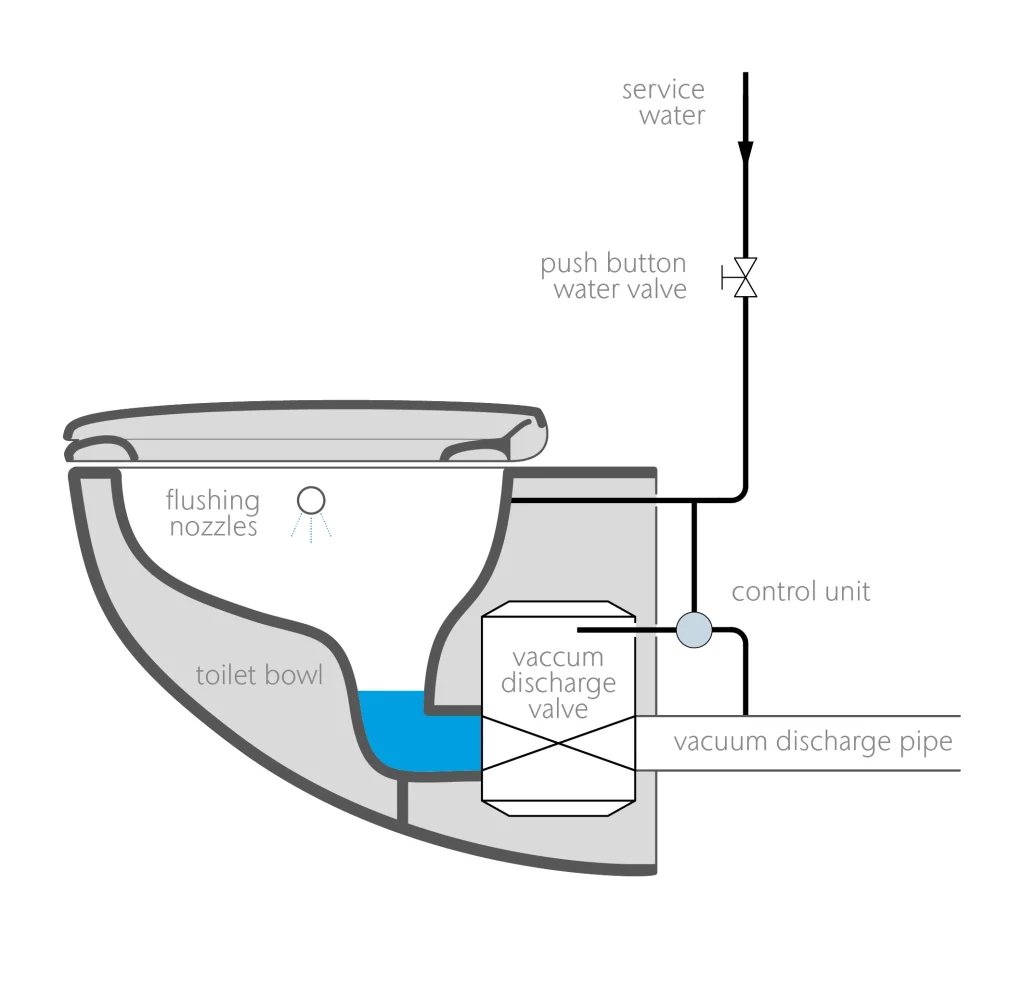
Vacuum flush toilets are a type of RV toilet that use a vacuum pump to flush waste into a holding tank. The toilet bowl is connected to a holding tank by a vacuum pump, which creates suction to pull waste into the tank. The vacuum pump is typically powered by electricity, and some models also require water to operate.
I don’t see these in North America that readily right now. They seem to be more used in marine applications, definitely need a bit more research on this type of RV toilet.
Vacuum flush toilets are popular in RVs because they use less water than traditional flush toilets, and can be easily installed in any location. Additionally, because waste is stored in a holding tank, the toilet can be used in areas where water and sewage hookups are not available.
One of the advantages of a vacuum flush toilet is that it is more water-efficient than other types of RV toilets. Because the toilet uses a vacuum pump to flush waste, it uses less water per flush than traditional flush toilets. Additionally, because the waste is stored in a holding tank, the toilet can be used in areas where water and sewage hookups are not available.
On the downside, vacuum flush toilets can be expensive to purchase and install, and they require electricity to operate. Additionally, the holding tank must be emptied periodically, which can be an unpleasant task for some RVers. I would honestly rather empty a black tank that carry a jug of urine into a public bathroom, but I’ve never done it and I’ve been emptying black tanks for 14 years, it’s just not a big deal to me anymore.
Lug-able-loo


The Lugable Loo is a type of portable toilet that is designed for outdoor activities such as camping, hiking, and boating. Honestly seems a bit overpriced for a bucket and toilet seat. Head down to home depot and make your own for a third of this price!!!
It’s important to note that this is just a branded version of a bucket potty system. The Lugable Loo consists of a 5-gallon plastic bucket with a snap-on seat and a lid. A plastic bag or liner is placed inside the bucket to collect waste. Once the bag is full, it can be tied up and disposed of in an appropriate trash receptacle.
One of the main advantages of the Lugable Loo is its portability and ease of use. It is lightweight and compact, making it easy to transport and set up in outdoor settings. It also does not require any special chemicals or treatments, and is easy to clean and maintain. I have read about folks using kitty litter as well.
Overall, the Lugable Loo is a good option for anyone camping without access to conventional RV amenities. As long as the waste is being disposed of properly I say why not? I have a freind who is a frequent car camper and he swears by it!
Everything you need to know about RV Toilet …Additives

Happy camper is by far, the most superior product for keeping your onboard holding tanks clean and fresh. I have tried several different methods and this is the absolute best. I spent a few summers boondocking on the beach in my Class A and I didn’t get to rinse my tank at all, the only thing that helped keep odours under control was “happy camper”. I had forgotten about it for some reason tried a bunch of different things, started using this again and no more odour problems.
Not only is Happy Camper the most effective odor neutralizer, it is also the most cost effective product on the market. Happy Camper’s highly concentrated water-activated mineral blend eliminates odor without covering it up with perfume like many of the chemical deodorant treatments. Happy Camper works most like an enzyme or bioactive treatment but is not affected by residuals (previous tank treatment chemicals) and unlike enzyme treatments you do not need to regularly add more treatment.
Happy Camper’s performance is not affected by extreme hot or cold temperatures and is not harmful to the environment. Happy Camper is a highly concentrated monohydrate blend of minerals and micro nutrients with enough waste treating power that 1 scoop of Happy Camper will treat a 40 gallon black tank and another scoop will treat your grey tank.
When presented with a particularly stubborn holding tank issue our service department relies on Happy Campers ability to break down waste within a few hours of treatment. We have had customers report they have used the Happy Camper holding tank treatment to eliminate clogs in kitchen sinks and showers without worrying about damaging their RV’s plumbing.

If you are having serious tank issues try the above product. It works like a charm, go for a long drive, let it slosh around in about half a tank of water. Some people recommend driving around with cubes of ice in the tank to dislodge any nasty bits. I haven’t tried that, but don’t see why it would hurt. When I first started full time RV life the internet was a fairly new invention nothing like the online university it is today, now you can learn everything you need to know about your RV commode without even leaving your home on wheels.
The GEO Method
This is a popular technique used by many RV owners to clean and maintain their holding tanks. It involves using a combination of water softener, laundry detergent. I have read some recipes that include bleach. I’m going to include that in the instructions, but be aware many people are very ANTI bleach in their tanks. There is a misconception that it breaks down plastic, but this doesn’t happen if bleach is diluted. In fact it is safe to use in your fresh water tank as well, but that is a discussion for another post.
Here are the basic steps for using the Geo Method:
- Begin by emptying your holding tanks as much as possible.
- Fill your black tank with fresh water, leaving about 1/3 of the tank empty.
- Add 1 cup of water softener to the tank. This will help break down solid waste and prevent it from sticking to the sides of the tank.
- Add 1 cup of laundry detergent to the tank. This will help clean the tank and eliminate odors.
- Add 1 cup of bleach to the tank. This will kill any bacteria and sanitize the tank.
- Fill the rest of the tank with fresh water.
- Let the mixture sit in the tank for at least 24 hours.
- After 24 hours, drain the tank and rinse it thoroughly with fresh water.
Repeat this process every few months or as needed to keep your holding tanks clean and odor-free. It’s important to note that some RV manufacturers do not recommend using bleach in the tanks, so it’s important to check your RV’s owner’s manual before using this method.

How to Clean Your RV Black Tanks
Everything you need to know about RV toilets that are gravity fed meaning they come with onboard holding tanks. You will likely have at least one Black and one Grey water holding tank. When these fill up you have to drain them at either a dumping station or your campground site. Let’s talk about the accessories that will help with draining your onboard tanks. Don’t forget your Grey tanks, people talk so much about cleaning and maintaining the black tanks they forget that the grey tank can be pretty odourific too. Most RV people recommend you let your grey tank fill up prior to emptying your black tank this will help rinse your stinky slinky after you’re done draining the black tank.
The best way to clean your RV black tank is to use a combination of methods that work together to break down waste, eliminate odors, and remove buildup from the tank walls.
Here are some steps you can take to effectively clean your RV black tank:
- Don’t forget your rubber gloves, some hand sanitizer and an antibacterial spray, particularly if using a public Sani Dump, i like to spray all my tank pulls and the bottom of my shoes after I’m done ( I know, a bit excessive, but not really!)
- Begin by emptying the tank as much as possible. Open the valve and let the tank drain completely.
- Add a black tank cleaner to the tank. There are many different products available on the market that are specifically designed to clean RV black tanks. Look for a cleaner that contains enzymes or bacteria that will break down waste and eliminate odors. Follow the manufacturer’s instructions for how much to use.
- Fill the tank with water. After adding the cleaner, fill the tank with fresh water until it’s about 2/3 full.
- Drive or tow the RV around to help agitate the water and cleaner inside the tank. This will help loosen any buildup that has accumulated on the tank walls.
- Let the tank sit for a few hours, or overnight if possible. This will give the cleaner time to break down waste and remove any buildup.
- Drain the tank again. Open the valve and let the tank drain completely. You may need to flush the tank several times to remove all of the cleaner and waste.
- Rinse the tank with a wand or hose. Use a wand or hose to rinse the inside of the tank thoroughly. This will help remove any remaining waste and cleaner residue.
- Repeat as needed. Depending on how dirty your tank is, you may need to repeat this process several times to get it completely clean.
By using a combination of a black tank cleaner, water, and agitation, you can effectively clean your RV black tank and keep it functioning properly. It’s important to follow the manufacturer’s instructions for any cleaning products you use and to take the time to rinse the tank thoroughly after cleaning to avoid any lingering odours.
Holding Tank Accessories
See Through Connection

A see-through connection with a flushing connection is a great addition to your black tank draining accessories. This will allow you to see when then the tank is rinsed properly, and it will also allow you to flush out the tank by connecting a water hose. Make sure to follow the instructions. When you are rinsing tanks etc it’s important to be there, set timers so you don’t forget what you are doing, there are many RVers who have accidentally flooded their RV with dirty water when rinsing tanks! I always set a timer. ALWAYS ALWAYS set a timer. The back flush method shouldn’t flood anything as you need to leave your tank open in order to use it. As every RVer knows, things can go sideways in a hurry if you’re not paying attention.
Sewer Hose

If you bought your RV from a dealership it most likely came with a “stinky slinky” as many of us like to call it. These do break down over time, you will need to replace it at some point, many folks recommend them every year. If you are spending the winter in any kind of cold climate the plastic will definitely break down and if you are spending time in any hot climates it will also break down. Every RVers nightmare is a stink slinky explosion. Check these regularly and replace them when needed! Biowaste is a hazard no one wants to clean up. A little care and maintenance goes a long way. Add it to your RV maintenance check list.
Stinky Slinky Support

You will see this type of RV hose support system. I have one, I use one, but I’m not a fan, if I’m parked anywhere for more than a month I will usually use a rain gutter aka eavestrough, instead. I find the hose will sometimes get between the connections in one of these accordion type supports and then you don’t get a smooth flow between the rv and the sewer drain. A rain gutter is fairly cheap and can run in as long of a straight line as you need, try to keep it on an downslope to keep things flowing smoothly. Also with the eavestrough system if you do have a leak in your drain hose you will notice it and it will be mostly contained in the gutter.
Black Tank Flush Wand

I highly recommend picking up one of these if you are having any issues at all with tank odours. I have a built in flush sytem in my Class A RV and I have used this handy little gadget on more than one occasion. I’m able to hook it up to my shower so that I don’t have to run a garden hoes through my rig to clean the toilet. I think it’s important to mention that I NEVER use my fresh water hose for any type of black tank process. I don’t connect it to anything other than my fresh water tank for simple peace of mind. Even though I am not currently drinking from my fresh tank because it’s not fresh at the moment, i still use that water for cooking and cleaning and wouldn’t want to risk any kind of human waste contamination.
Fresh Water Hose

Everything But Hose…
I actually love the kink-free metal hose. It’s lighter, it’s easier to pack up and stow away, I think it’s easier to keep clean and it will last longer. It’s less delicate when it comes to extreme heat and cold. It’s important to drain it properly when it’s freezing outside.

Conclusion of Everything You Need to Know About RV Toilets

All you need to know about RV toilets and more. Full-time RV life is not for the faint of heart. There are things that I do on a regular basis that my girlfriends would never want to do without the help of their husbands. In fact I’m often the gal in a group with the most know-how when it comes to these kinds of things, not always, but more often than not.
If you are trying to choose a toilet for your van build or your tiny home the thing you want to evaluate most is where you will be spending the majority of your time. A life of boon docking is completely different than a stationary lifestyle. I’m not telling you which is better, I’m just telling you they require different things.
Please like and share my posts. Please do click on my links if you plan to buy anything I have talked about. It doesn’t affect anything for you but I get a small percentage and that helps to keep this website up and running!
If you enjoyed this blog post I think you might like the one I wrote about the best water filter system for your RV.

